Block Ads & Trackers at Home With a Pihole
What if I told you that you could spend very little money on a tiny computer that you could then set up to block ads and trackers while you are connected to your home network? If you have an old computer lying around collecting dust, you could even potentially use that to achieve the same thing for free! Sound too good to be true? Well, it’s not. It is something I’ve been doing for years. If you wish, you can even use the same device to block certain websites from certain devices on your network, which is great for parents!
What is Pihole?
[Pihole](Pi-hole – Network-wide protection) is open-source software that turns a device into an ad and tracker blocking DNS server for a network. It is completely free software that is updated regularly and has been around for several years. After properly setting up a device on your network to run Pihole, you can easily block any website URL from being accessible from your network which is handy for blocking ads, trackers, porn, Facebook, etc.
Pihole gets its name from the fact that it is an IP black hole that was designed to run on a Raspberry Pi.
What is a Raspberry Pi?
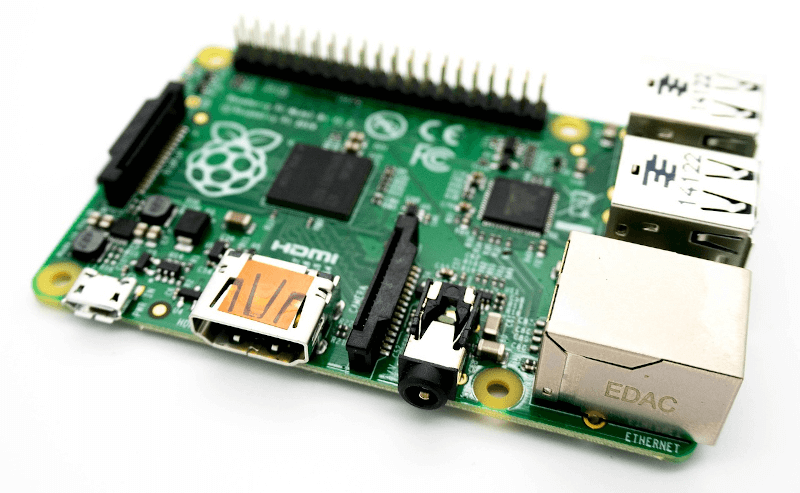
A Raspberry Pi is a credit card-sized computer, also known as a SOC or “system on a chip”. This means that everything needed to be used as a computer is present on this single board. Most models have USB ports, an HDMI or micro-HDMI output for video, a micro-SD card slot, built-in Wi-Fi and Bluetooth, and even an ethernet port.
These tiny little computing power-houses are all the rage amongst electronics hobbyists. I have 4 connected to my network right now, being used in different ways. I have:
- 1 Raspberry Pi setup as my DNS server running Pihole
- 1 Raspberry Pi set up as a NodeJS web server running my video game collection software
- 1 Raspberry Pi running OpenHAB to have some smart-device automation in my house
- 1 Raspberry Pi running Octoprint that is connected to my Ender 3
There are a ton of projects you can do using a Raspberry Pi. That said, it can also serve as a cheap computer you can use to browse the web, check social networks, etc. The possibilities are endless!
How Does Pihole Work?
The idea behind how the Pihole software works is quite simple.
Once you install the software, you configure your router to use the device running Pihole to act as your DNS, or domain name server. Most people don’t manually configure a DNS and use their ISP’s (internet service provider) so this might not be an idea you are familiar with. The Pihole software keeps 2 lists: a blacklist of sites to block and a whitelist of sites to always allow. When you have a device running Pihole working as your DNS, it will block every site on the blacklist from connecting to any other device on your network. It does so by redirecting the request for a site on the blacklist to your own device. This means that if you connect to a page that would normally have an ad, but the ad provider’s address is on the blacklist, then the ad will not show. The same goes for trackers as well. The whitelist really just serves as an override to the blacklist so you have a quick way to allow connections to a particular site even if it is on one of your ad lists, and any site not on either list may connect.
One of the great things about Pihole is that there is a community of enthusiasts that create and maintain many blacklists for the rest of us. Whether you want to block all Facebook addresses, only block ads, or even block porn sites, there are several lists you can easily add to automatically suit your needs. You can add entire “ad lists” to your configuration or manually add sites one at a time. It’s your choice.
Setting Up Your Pihole
This tutorial will cover how to set up the Pihole software on a Raspberry Pi. You can use any other device as long as it is running a supported OS, but the method for setting it up may differ slightly.
What You Will Need
a Raspberry Pi. I would say look for a Raspberry Pi 2, 3, or 3B+ as they are cheaper and plenty powerful. Using a Raspberry Pi 4 is overkill and the first model is slightly underpowered for the job. If you get the RPi 2, you will either have to plug it into your network via an ethernet port or buy a Wi-Fi dongle, as this model does not have Wi-Fi built-in. You can also use a Raspberry Pi Zero W, but you will need a mini-HDMI cable and a USB hub to finish the setup.
a micro SD card. It doesn’t need to be huge, but I wouldn’t go smaller than 8 GB.
a Raspberry Pi power supply. There are several ways to power a Raspberry Pi, and you can even do so from a USB port on another device, but you have to have something to power it and it does not come with anything unless you buy a bundle.
a Raspberry Pi case. You need nothing fancy here, just something to enclose the RPi and keep it protected.
access to a computer. You will have to download an image to flash onto the micro SD card so a computer is needed.
a micro SD card reader or equivalent so your computer can write to the micro SD card.
- Installing Raspberry Pi OS
Download an Operating System for Your Pi
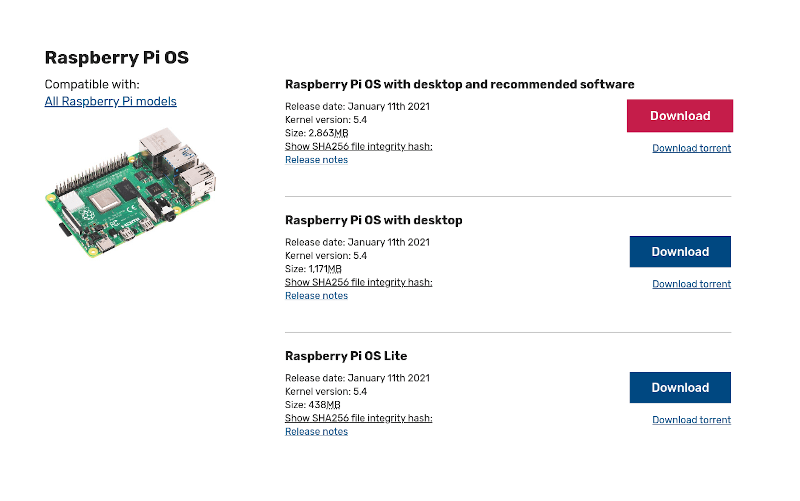
If you go to the official Pihole website and look at the supported operating systems, you see that Raspberry Pi OS (formerly Raspbian) is at the top of the list. You can download Raspberry Pi OS at this link: https://www.raspberrypi.org/software/operating-systems/#raspberry-pi-os-32-bit. I recommend the ‘Lite’ version as you will need none of the desktop software that comes with the other versions.
Flash Raspberry Pi OS to Your Micro SD Card

Once you have the image file for Raspberry Pi OS Lite downloaded, it is time to flash that onto the micro SD card. There are several ways to do this, but let’s do one of the easiest ways I know; using an app called balenaEtcher. This will work whether you are on Mac, Windows, or Linux. You can use any app that will flash images, and if you are on Linux you can even just use the dd commands if you are familiar with those, however, this tutorial will use balenaEtcher for simplicity. Go to the following website to download balenaEtcher: [https://www.balena.io/etcher/]https://www.balena.io/etcher/](https://www.balena.io/etcher/)
Now you should have the Raspberry Pi OS image downloaded and balenaEtcher installed. We are almost ready to flash that micro SD card! The last thing we have to think about is formatting that card. It needs to be formatted with the FAT32 file system. There are several ways to accomplish this
For Linux users, I recommend just downloading gParted and using that to format your micro SD. Make sure you choose “primary partition” and “FAT32” before you click on the green checkmark. For a full tutorial on using gParted, you can check out this one I found that does a good job explaining it: [Format a micro SD card using gparted utility – Tech For Talk](Format a micro SD card using gparted utility – Tech For Talk)
For Windows users, you can easily format the micro SD using the format utility in Windows as long as the micro SD card is under 32GB in size.
For micro SD cards under 32GB: Simply open Windows Explorer, right-click on the removable drive with the letter Windows assigned to your micro SD card, and select “Format”. From there, change the file system to FAT32 and leave the other fields alone. You can add a label to the volume if you would like, but it isn’t required.
For micro SD cards over 32 GB: Windows will not give you FAT32 as an option when you try to format the micro SD card. You are going to need software for this! I have used a little portable app called “FAT32Format GUI” several times in the past with outstanding results. You can download that here: [FAT32format GUI - Download](FAT32format GUI - Download). The site looks a little sketchy, but as long as you just click the download button on the right near the top, then click on a mirror link, you should be fine. This downloads a portable app meaning you don’t have to install it. You can just run the executable to run the app. Select the drive letter assigned to your micro SD card and check the box next to “Quick” and leave everything else alone. Then click “Start” and, within a few seconds, it should format your micro SD card to FAT32 as you need.
For Mac users, throw away your Mac and buy a real machine! Just kidding. I have only ever used a Mac for software development. Tech companies often issue MacBook Pros to software engineers, so they have forced me to use a Mac occasionally. That said, I’ve never used one for anything other than writing code, so I have personal experience with formatting a removable drive in Mac OS. I did, however, look around and found this article that seems to explain 3 different approaches to formatting your micro SD using a Mac: https://www.easeus.com/mac-file-recovery/format-usb-flash-drive-to-fat32-on-mac.html
After flashing the micro SD card with Raspberry Pi OS, you should now be able to put the micro SD card into your Raspberry Pi, plug it in, and see it boot into the OS for the first time. For the sake of simplicity, we’ll finish setting up our Pihole while plugged into a keyboard and monitor. I feel like it is safe to assume that, if you are setting up a Pihole, you likely have access to a monitor or TV and a keyboard to make it through the last part of the setup.
Installing Pihole
You’ve flashed the micro SD card with Raspberry Pi OS, put it into the Raspberry Pi, and plugged in your Pi, and watched it boot for the first time. Now you just have some configuration to take care of, then you can install Pihole.
Connecting Your Pi to Your Wi-Fi (OPTIONAL)
If you are going to connect your Pihole to your home network by connecting it to your router with a LAN cable, then you can skip this section. That is ultimately the best way to connect your Pihole, as it will allow for a more stable connection and speed. The Raspberry Pis version 3 and higher and the Pi Zero W have built-in Wi-Fi while the other versions of the Pi don’t. That said, you can find a Wi-Fi dongle at this site to allow your older Raspberry Pi to have Wi-Fi: https://www.canakit.com/raspberry-pi-wifi.html
If you have no choice but to connect it to Wi-Fi, have no fear! It will still work, and it isn’t that difficult to set up. You will simply run a command, authenticate with the default username and password, and it will open a menu that will make this simple.
The first thing you need to do once your Raspberry Pi has finished booting and has an empty command prompt is to type the following command:
sudo raspi-config
This will not run without user credentials, but you have not created a user yet so you must use the default credentials. When prompted, the default username is pi and the default password is raspberry. We’ll change that in a few minutes for security reasons, but for now, that is what you need to use when prompted.
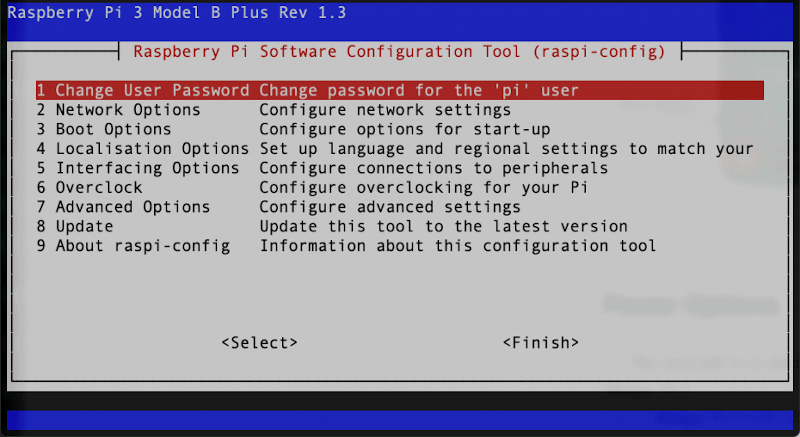
After running the raspi-config command and authenticating with the default credentials, you should now be presented with a very basic graphical interface similar to the one in the picture above. Notice that the second option is “Network Options”. That is the one we want. You can use the arrow keys on your keyboard to navigate to that option and press “Enter”.
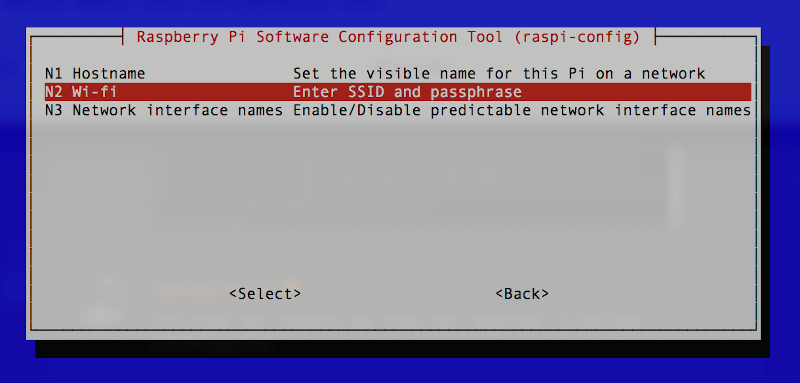
Once the network options are opened, you will see that the “Wi-fi” option is the second one again. Highlight that option and press enter again.
Now, you need to know the SSID for your Wi-Fi (the name of it). Connecting your Raspberry Pi isn’t the same as your smartphone or computer, where it scans for networks and gives you options. You need to type the SSID of your Wi-Fi in manually and it IS case sensitive so you have to get all the capital and lowercase letters correct. If you are unsure of exactly what the SSID is, I suggest you look in the Wi-Fi options on your phone or computer to see exactly how to spell it.
Once you’ve correctly typed the SSID, press "enter" and it will prompt you to enter the password. Enter the password to your Wi-Fi network correctly, and your Raspberry Pi should now connect.
Make Your Raspberry Pi More Secure

There are lots of things you can do to “harden” your Raspberry Pi. We are only going to concern ourselves with changing the default login in this post, but if you want to dig deeper, you can certainly find more information on the web. Since everyone that has ever used Raspberry Pi OS knows that pi and raspberry are the default credentials, we want to change this so no one else can easily gain access to our pi.
You can change the password using the passwd command from the terminal, but for those of you not comfortable in a terminal, we will use raspi-config to make this easier.
If you connected your Pi to Wi-Fi then you should still be in raspi-config. If not, or if you exited, type sudo raspi-config to launch the menu.
The first option on the menu is for changing the default password. Using the arrow keys and “Enter” select this option and change the password to something strong and unique. The password you use here will be the password you use for the rest of this tutorial, and every time you want to login to your Raspberry Pi from now on!
Update Your Raspberry Pi
We need to update our Raspberry Pi OS before we install Pihole. Have no fear, for this can be done with a couple of simple commands!
If you are still in raspi-config, use the arrow keys and “Enter” to get back to the terminal. Once there, type the following command:
sudo apt-get update && sudo apt-get upgrade -y
As a quick overview of what this command is doing, it is basically saying to fetch the updates then install them using administrative rights. That said, it will prompt you to enter the password once you press enter. Remember, this password is now whatever you set it to be earlier.
It might take a couple of minutes to fetch and install all the updates, so just sit patiently and let your Raspberry Pi make the operating system current. Once this finishes, you only need to run the command to install the Pihole software and, optionally, remove the VS Code repository from your Raspberry Pi.
Remove the VS Code Repository from Your Raspberry Pi (OPTIONAL, but recommended)
For some reason (I’ll assume that reason is “money”), Raspberry Pi OS began including the Microsoft VS Code repo by default. It is a popular code editor, but I feel like anyone who writes code and wants VS Code on their Pi could probably figure out how to add a repo. The bottom line for us, it’s there and we don’t need it so let’s remove it!
From the terminal, you will need to enter the following commands:
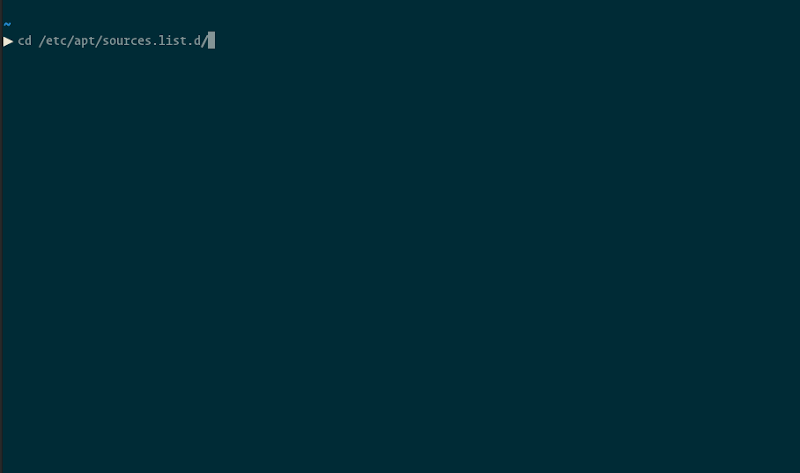
cd /etc/apt/sources.list.d- this will navigate you to the correct folder
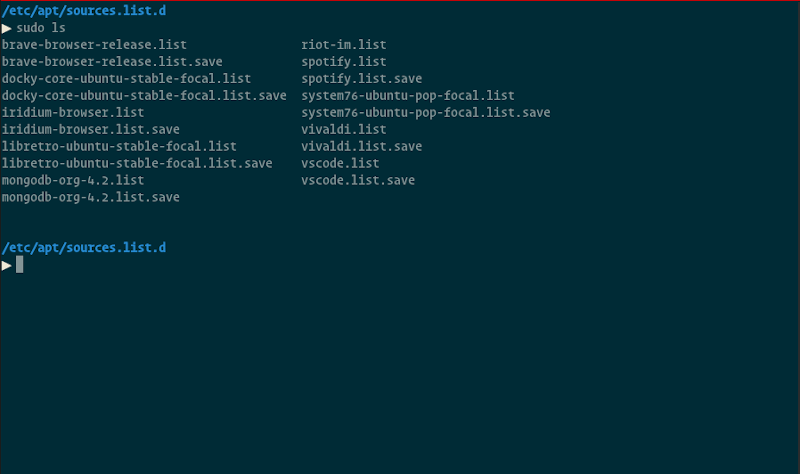
sudo ls- this will list everything in this directory. You will be looking for something with ”Microsoft” or “vs code” in it.
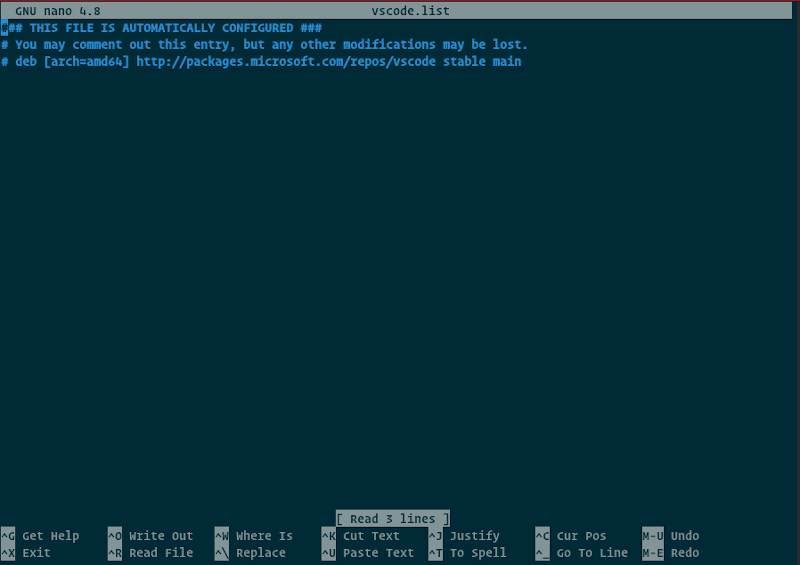
nano vscode.list- this opens the file to be edited (you can use Vim here as well if you prefer)
Comment out the line with the URL in it by adding a # in front of it. Then you just need to save and exit the file.
- If you used Nano, you can simply press
CTRL + xwhich tells Nano to exit. If Nano detects file changes then it will prompt you to save. Just tell it to save and you are done! - If you used Vim, you would have had to hit
Insertto put the file into edit mode to make any changes at all. To exit that mode, hitEsc, then type:wqand hitenterto save and exit.
Congratulations, you have blocked the Microsoft VS Code repo from being used! This makes sure your Pi isn’t talking to a Microsoft server and will potentially speed up your OS updates in the future. Your tinfoil hat can never be too thick!
Installing Pihole (FINALLY!)
FINALLY, it is time to install the Pihole software! It is SUPER simple to do. We’re just going to run a command again, or a couple of commands depending on how you want to do it.
At the time of this writing, I believe “wget” is installed on Raspberry Pi OS by default where “curl” is not. Some people have a preference as to which command they would prefer to run (I prefer curl). I’ll go ahead and post a couple of ways to start the installation for the opinionated folks out there!
wget
wget -O basic-install.sh https://install.pi-hole.net

sudo bash basic-install.sh
curl
sudo apt-get install curl -y

curl -sSL https://install.pi-hole.net | bash
That’s it! Note that each code block above has 2 lines to be run. They have to be run in order and 1 at a time. Regardless of whether you use the wget commands or the curl commands, it will take some time for the Pihole software to download and install everything. Grab yourself a snack or something and just give it a chance to finish.
Get Your Raspberry Pi’s IP Address
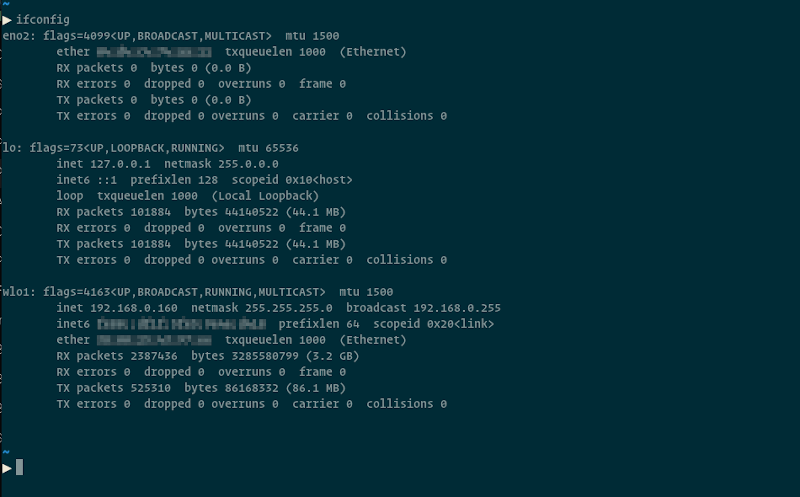
Once it finishes, you are almost done dealing with the Raspberry Pi directly. All you need to do now is get the IP address of your Raspberry Pi so you can use it as your DNS server.
A quick way to get your Pi’s IP address is to simply type ifconfig. This will display a few results, each taking up several lines. Notice out to the left of each block of results and you’ll see some text that indicates which network interface the block is for. For example, if your Pi is connected via Wi-Fi then you are looking for text out to the left that begins with wlan or wlo and likely has a number after it. If your Pi is connected via an ethernet cable, then you are looking for eth or eno. Once you find the correct block of results, look for a line that has inet in the beginning as it should contain your IP address. More than likely (but not certainly) your IP address will look something like 192.168.1.15. Write that address down! You’re about to need it.
Configuring Your Other Devices to Use the Pihole to Block Ads
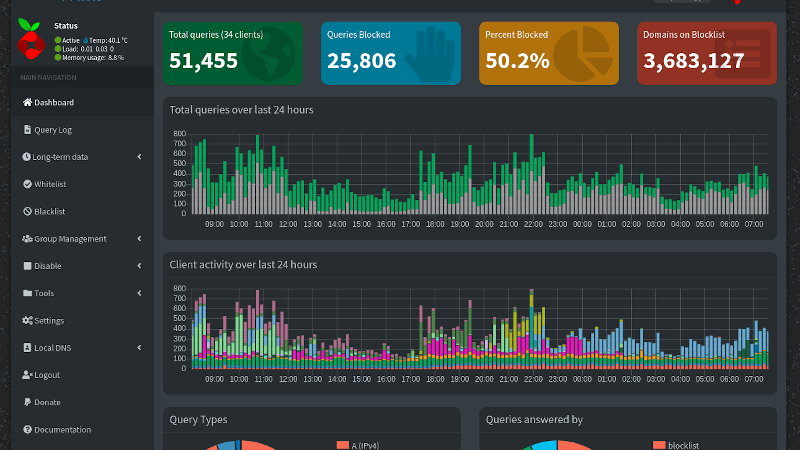
First things first, open a browser on your phone or computer and, in the URL bar at the top, type in http://, followed by your Raspberry Pi’s IP address, then /admin/index.php at the end. For example, at my house, I would type [http://192.168.0.11/](http://192.168.0.11/admin)admin/index.php. Once you do this and press “enter”, your browser SHOULD navigate to your Pihole interface. This verifies that your Pihole is up and running. You can do further research to learn about how to use many of the options here for more functionality. I have plans to eventually do more articles about this functionality, but I figured that this tutorial is already long and potentially difficult enough to not include those instructions here.
We’re finally able to get some ad-blocking action going here! You have to decide whether you want to block ads for every device on the network or block ads for only certain devices. Once you decide on your approach, find the section below that corresponds with your selection.
Blocking Ads for the Whole Network
This is how I do it and how I tell most folks to set up their Pihole. Not only can you use your Pi to block ads for every device connected to your network, but you can also selectively block social networks, porn, etc for kids, work computers, and more by creating groups and putting individual devices in each group through your Pihole interface.
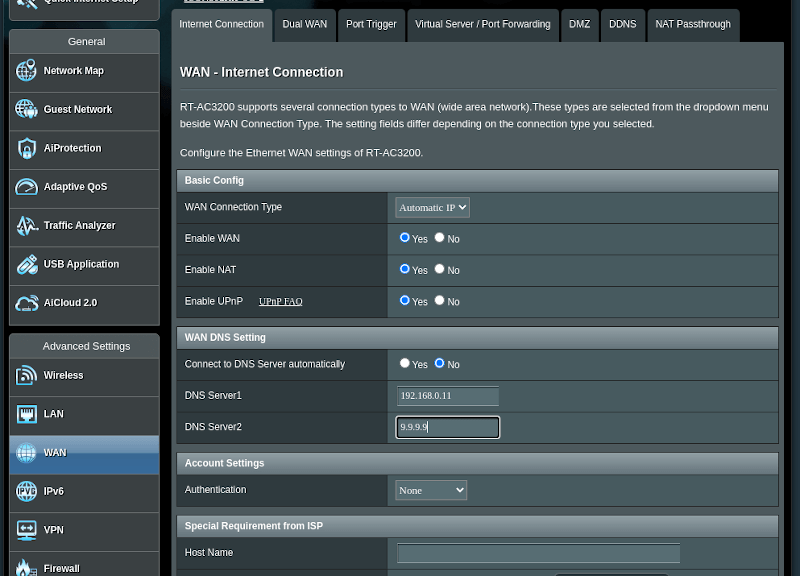
The secret here is that you want to add your Raspberry Pi’s IP address to your wireless router’s setting as the DNS server. The problem here is that I can’t possibly explain in detail how to do this for everyone considering that there are a ton of different wireless routers out there with different interfaces. I can only give you the 5,000 ft view of how to do this and hope you can find out how to finish this on your own.
If you don’t know how to connect to your router’s interface, you’ll need to find that out. Usually, it is just a matter of navigating to the router’s IP address via a browser and usually, your router is at one of the first addresses in your subnet. My router lives at 192.168.0.2 because my modem is at 192.168.0.1. Your setup will likely differ, but it will likely follow the same kind of idea.
Once you are connected to your router’s web interface, find the area with the DNS settings. You want to put the IP address of your Raspberry Pi as your first DNS entry. After that, you need a backup DNS entry in the second spot. Essentially, your second DNS entry will do the actual domain name lookup for you as your Raspberry Pi in the first entry is just going to block addresses that are on your blacklist. There are several DNS providers to use, and manually entering one here is substantially better than using your ISPs default DNS server! I recommend entering 9.9.9.9 for a secure, encrypted DNS (Quad9) or 1.1.1.1 for smoking fast DNS service by Cloudfare if you want to trust them (I don't). You can find several more DNS providers here: [Encrypted DNS Resolvers | PrivacyTools](Encrypted DNS Resolvers | PrivacyTools)
After adding your Raspberry Pi as your DNS server, you should be living relatively ad-free while on your home network! It can’t block everything, but Pihole does a good job of updating to make sure they block new addresses of ad providers.
Blocking Ads on a Per-Device basis
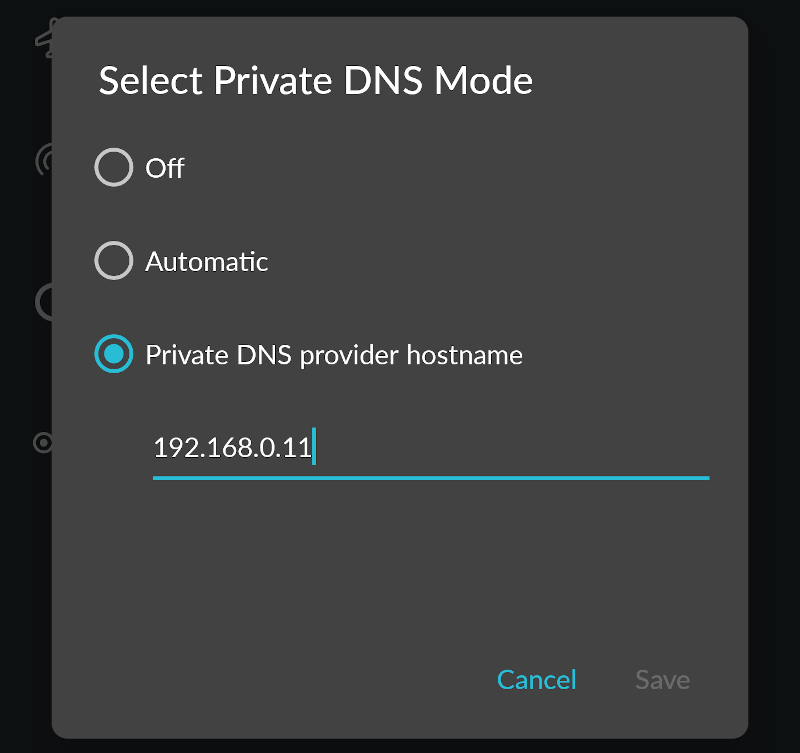
You’re on your own here. Again, every device is going to have a vastly different way to accomplish this. Essentially, you just need to add the IP address of your Raspberry Pi to your device’s DNS server settings. This process will vary from different phones, operating systems, tablets, etc.
What I would recommend doing here is searching for “how to change DNS on
The benefit to taking this per-device approach is that the rest of the devices on your network will remain unchanged. To give an example of why this might be a good approach, consider that my wife works as a marketing manager and a lot of marketing today is done with ads and social networks. Guess what, your Pihole blocks ads and you can set it up to block social networking as well (I have). This is an example of where I might want to set up my devices to use the Pihole but not hers. Now, I will say that I use my Pihole network-wide because you can create groups to put devices into then choose which sites are blocked for each group. That’s a topic for another post in the future, but my wife needing access to ads and social networks is a decent example of a real-world situation where you might opt to only use the Pihole on a per-device basis.
Enjoy Your Ad-Free Experience
At this point, you’ve successfully installed Pihole onto a Raspberry Pi and set it up to block ads for you. Pat yourself on the back! That wasn’t too difficult, but I won’t say it was simple either.
Now, if you want, you can explore some more of the functionality that Pihole provides, how to use the admin web-interface, where to find more ad lists so you can boost the number of blocked sites, and more! You can do quite a bit with a Pihole setup, but I feel like this post is more than long enough so we’ll leave off at the basic setup!
I do plan on writing some articles in the future that cover how to add more ad lists, block social networking, use it as a parental filter to block adult content for kids, and so much more! Keep checking back to learn how to take your Pihole to the next level!What if I told you that you could spend very little money on a tiny computer that you could then set up to block ads and trackers while you are connected to your home network? If you have an old computer lying around collecting dust, you could even potentially use that to achieve the same thing for free! Sound too good to be true? Well, it’s not. It is something I’ve been doing for years. If you wish, you can even use the same device to block certain websites from certain devices on your network, which is great for parents!